I’m going to preface this by saying that there is no pattern support for the spreadsheet. If you follow the instructions on the spreadsheet you shouldn’t have any problems! Skip to the fifth paragraph to get straight to the instructions!
When I’m designing a shawl I always work with a spreadsheet so I can measure my yarn use. There are a few reasons for this – it lets me get the most shawl I can out of my yarn and more importantly, it makes sure I stay within my yarn allowance! I am a tight knitter. When I design a shawl I use a 10% – 20% yarn allowance. This means I use 80g to 90g of a 100g skein. The spreadsheet below is a simplified version of the one I use when designing!
I designed Shoormil as part of a collaboration with Claire and she sent me two gorgeous skeins of single ply merino/silk/alpaca to use. The skeins are 115g (503 yds) each so when I decided to use a 20% yarn allowance, that meant I needed to design a shawl using 92g (402 yds) of each colour. I planned it all out and in the end, I used 89.35g (391 yds) of the yellow and 91.87g (402 yds) of the blue, so you can definitely make Shoormil with an average 100g skein of yarn if you’re careful with gauge!
This is where the spreadsheet comes in! No one wants to do a swatch for a shawl (and yes, gauge swatches aren’t always accurate) so the spreadsheet allows you to track your current usage and will predict your usage for the rest of the shawl! Only fill in the green squares on the spreadsheet otherwise you might disrupt the formulas that make it work! If you are using the spreadsheet from Google Sheets, make sure you go to File -> Make a Copy before you start.
Get the spreadsheet on Google Sheets.
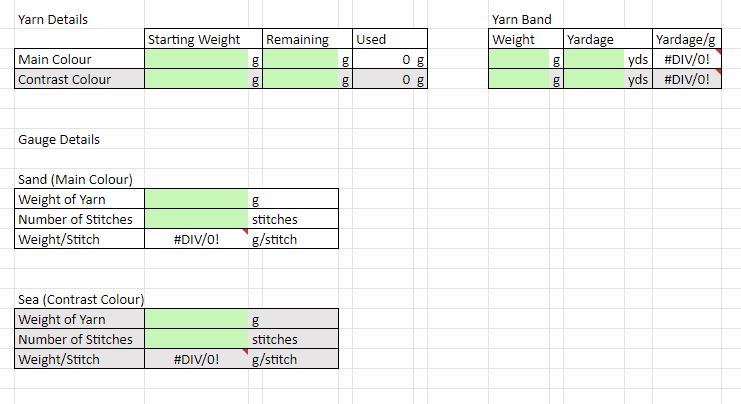 The first step is to weigh your yarn each skein of yarn and enter it in the Starting Weight fields, then fill in the details from the ball band. When you get a 100g skein of yarn, you very rarely just get 100g. Usually, it’ll be a gram or two over, occasionally it might be a gram or two under. It’s important to know what you’re starting with so you can track how much you’ve used. The more accurate your scales are the more effective the spreadsheet will be. I have scales that weight to two decimal points but a digital kitchen scale will work too.
 The spreadsheet has 5 columns. The first three are the row number (most useful in the stripe and sea sections), the stitch count for that row (useful for finding your place in the sand sections) and the total stitch count for the shawl to that point (you need this for the gauge).
Knit the garter stitch tab and at least 20 rows of the shawl. Weigh your ball (or cake) of yarn and enter the amount in the “Remaining” box. The spreadsheet will tell you how much yarn you have used and you enter this number in the “Weight of Yarn” box in the gauge section. Then get your total stitch count from the table and enter this into the “Number of Stitches” box.
The spreadsheet will work its magic and predict how much yarn you’ll need for the shawl. Scroll down to the last yellow row for the main colour (Row 24 in the stripe section). If the amount in the “Yarn Used” column is more than the yarn you started with then you’re going to run out of yarn and you have two choices – start again (with a smaller needle), or get more yarn! If the amount in the “Yarn Used” column is less than you started with then you’re good to go! I recommend checking the spreadsheet a few more times as you go through the spreadsheet to make sure you’re still on track.
When you reach the stripe section, you need to repeat the process with your contrast yarn. I would recommend checking after each contrast stripe and a few rows into the sea section. You may need to use a different needle for the sea section than you used for the sand section.
Good Luck!